Monthly Archives: June 2019

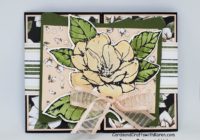
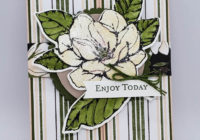
Simple Elegant Birthday Card

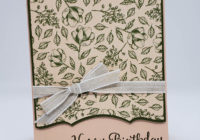
Happy Sunday!  Hard to believe it’s the last day of June, here has the first of the year gone! Hopefully I’ll be able to get some pool time into, Saturday we had thunder storms all afternoon – not the best for pool time.

Today I thought I would share a simple elegant card featuring Magnolia Lane Designer Series Paper and the border die from the Magnolia Memory Dies, part of the Good Morning Magnolia Bundle.

The card starts with a card base of Petal Pink card stock cut 4.25″ x 11″, scored at 5.5″ for a top folding card. At the bottom I stamped ‘Happy Birthday’ from the Beautiful Day stamp set in Mossy Meadow ink.

To make the focal unit, I first die cut the bottom of both pieces of paper with the border die, then cut from the top so that I had pieces that layered together nicely with a slight border all around.  Before adhering the unit to the card front with Stampin’ Dimensionals, I added a piece of White Linen Ribbon tied with a bow from the Magnolia Lane Ribbon Combo Pack. The pack has both White Linen Ribbon and Mossy Meadow thread.

  •  Magnolia Lane Designer Series Paper is 4″ wide x 5″ long
  •  Mossy Meadow mat is 4 1/8″ wide x 5.5″ long

So what designer paper do you have to try making this card with?

Thank you for taking the time to stop by today, hope this project has inspired you to try paper crafting. Have a great day – Craft On!

Follow me on Instagram @cqueen309 and on Facebook at “Cards and Crafts with Karen”.

Click on any of the images below for more product information and to order directly from my on-line store.

When shopping, please add the current Host Code 2XHVYVB9 to your order and check demonstrator contact, then I can happily send you a re-useable thank you card. For orders is over $150, please use all of the Host Rewards you’ve earned.  Otherwise, I’d love for you to add your order to the current Host Code 2XHVYVB9.

Happy Shopping!

2019-2021 In-Colors for FabFri166

Happy Friday! It’s going to be a hot & sunny weekend here, perfect for some pool time!

Today’s card is for the FabFri166, an introduction to the new 2019-2021 In-Colors, check out their blog here.


For my card I am featuring the new Beautiful Friendship Photopolymer stamp set for the floral images which teams nicely with a sentiment from the Beautiful Bouquet Photopolymer Stamp set. The floral images are all stamped in the new In-Colors on a mat of Basic Black and Purple Posy card stock base. To create the image I started with the largest images in Seaside Spray, next some Rococo Rose and Terracotta Tile flowers and empty spots filled in using images stamped in Pretty Peacock ink.

To finish off the card, before adhering the stamped images I wrapped a piece of Glittered Organdy Ribbon about 1″ from the bottom and adhered to the back with mini glue dots. The sentiment is stamped in Memento Black ink on Whisper White and die cut using the smallest Stitched Shape Circle, layered on a Purple Posy 1½” circle on a Basic Black Pretty Label Punch out piece, two pearl embellishments finish off the card.


Thank you for taking the time to stop by today, hope this project has inspired you to try paper crafting. Have a great day – Craft On!

Follow me on Instagram @cqueen309 and on Facebook at “Cards and Crafts with Karen”.

Click on any of the images below for more product information and to order directly from my on-line store.

When shopping, please add the current Host Code 2XHVYVB9 to your order and check demonstrator contact, then I can happily send you a re-useable thank you card. For orders is over $150, please use all of the Host Rewards you’ve earned.  Otherwise, I’d love for you to add your order to the current Host Code 2XHVYVB9.

Happy Shopping!


Happy Birthday Diane!

Happy Birthday to my sister-in-law Diane, hope you have a great day!

Today I’m sharing with you the card I’ve sent Diane for her birthday, it’s a gate fold card featuring Good Morning Magnolia Bundle (cling mount stamp set & matching dies) as well as the Magnolia Lane Designer Series Paper. While not part of this suite of products, I’ve added the Petal Pink Organdy Striped Ribbon for the bow.

Here is a close up of the belly band used to keep the card closed. The flower was stamped in Staz-On Black ink on Watercolor paper, then colored in Petal Pink and Mossy Meadow before being die cut with the matching die. Tip for water coloring with foam ink pads: take a clear block, tap into the ink pad and use the ink on the clear block and your aqua painter to color the image. I’ve added pearl embellishments to the center of the flower and around the image on the designer series paper for the right amount of bling, you can even add Clear Wink of Stella for some sparkle.

For the inside of the card, I’ve stamped the magnolia flowers in opposite corners using Petal Pink ink and then added the Mossy Meadow images and greeting.  The flowers on the sides are stamped with Staz-On ink then water color before being die cut and adhered with Stampin’ Dimensionals.

Thank you for taking the time to stop by today, hope this project has inspired you to try paper crafting. Have a great day – Craft On!

Follow me on Instagram @cqueen309 and on Facebook at “Cards and Crafts with Karen”.

Click on any of the images below for more product information and to order directly from my on-line store.

When shopping, please add the current Host Code 2XHVYVB9 to your order and check demonstrator contact, then I can happily send you a re-useable thank you card. For orders is over $150, please use all of the Host Rewards you’ve earned.  Otherwise, I’d love for you to add your order to the current Host Code 2XHVYVB9.

Happy Shopping!


July 2019 Paper Pumpkin

Looking for some fun crafting each month? Then Paper Pumpkin may just be for you. With a Paper Pumpkin subscription you receive an “Orange Pumpkin” box each month with a fun new craft. Some months are cards, other are projects like goodie bags, treat holders, always something fun. Each month your kit includes a stamp set and all the supplies needed to create the project.

How about some Summertime Fun, sign up by July 10th to get the July 2019 kit.

This month, Paper Pumpkin is providing unprecedented catalog coordination, giving you THREE new suites that can be mixed and matched with July’s kit.

With THREE suites to seamlessly combine with the July kit, your vision of what you can do expands from crafting with a single kit to creating with a full range of brand new Stampin’ Up! products. The product coordination is a bridge to “more.”

The July Kit + 3 Coordinating Suites (below) = SO many fun projects

Woven Threads Suite p. 13–14

Garden Lane Suite p. 40–41

Come Sail Away Suite p. 144–145

Why not give Paper Pumpkin a try?  Check out the Paper Pumpkin page of my blog to see video’s for this years monthly projects.

Thank you for taking the time to stop by today, hope this project has inspired you to try paper crafting. Have a great day – Craft On!

Follow me on Instagram @cqueen309 and on Facebook at “Cards and Crafts with Karen”.

Click on any of the images below for more product information and to order directly from my on-line store.

When shopping, please add the current Host Code 2XHVYVB9 to your order and check demonstrator contact, then I can happily send you a re-useable thank you card. For orders is over $150, please use all of the Host Rewards you’ve earned.  Otherwise, I’d love for you to add your order to the current Host Code 2XHVYVB9.

Happy Shopping!


June 2019 – Sunday Stamper Cards

Hello there – it’s Sunday Stamper day!

Today I am sharing with you the cards we will be making when we get together. I’ll be featuring three of the new stamp sets from the Annual Catalog, two that are part of a bundle. Remember with bundles you save 10% off the price of the stamp set & punch or die when priced together.

  • Floral Essence Bundle
    •  Floral Essence Photopolymer Stamp Set
    • Perennial Flower Punch
  • Daisy Lane Bundle
    • Daisy Lane Cling Mount Stamp Set
    • Medium Daisy Punch
  •  Seaside Notions Cling Mount Stamp set

First up are two samples of the same design, each has the 4″ x 4″ square of Designer Series Paper cut at a different angle to provide the space in between for stamping your greeting. Card features the Floral Essences stamp set & matching paper.  I’ve used the Well Said & Seaside Notions stamp sets for my greeting. The ladies will be able to pick the greeting of their choice.

The second card mixes two products from the Perennial Essence Suite – the designer series paper and colored vellum card with the Seaside Notions stamp set for a cute summer card.  Noble Peacock Rhinestones add just the right amount of bling, as they come in Blueberry Bushel, Gorgeous Grape, Melon Mambo, Old Olive and Pretty Peacock.

Finally the third card a Pop Out Swing Card – the ladies will get to pick the Layering Square or Circles Dies, I’m showing you the front of a card with the Layering Circle Dies and . . .

and the inside when the Layering Square Dies are used.


Thank you for taking the time to stop by today, hope this project has inspired you to try paper crafting. Have a great day – Craft On!

Follow me on Instagram @cqueen309 and on Facebook at “Cards and Crafts with Karen”.

Click on any of the images below for more product information and to order directly from my on-line store.

When shopping, please add the current Host Code 2XHVYVB9 to your order and check demonstrator contact, then I can happily send you a re-useable thank you card. For orders is over $150, please use all of the Host Rewards you’ve earned.  Otherwise, I’d love for you to add your order to the current Host Code 2XHVYVB9.

Happy Shopping!

To A Wild Rose for PCC341

How did your week go? We had the living room, kitchen, dining room and hallway painted, now the fun starts cleaning and putting everything away.

Today’s card is for the Paper Craft Crew Card Vertical Sketch challenge PCC341, you can check out their blog here.

Thank you to the team over at the Paper Craft Crew for selecting my card from PCC338 as a top pick, you can see that post here.


For my card I decided to use the bundle “To A Wild Rose”, when I first saw this stamp set in the catalog I knew I just needed to purchase it.  The bundle includes the photopolymer stamp set and matching Wild Rose Dies. The set features a regal 3-step rose inspired by Million Sales Achiever Mary Ellen Byler.

The rose was stamped in Rococo Rose, the outline image was stamped full strength, second layer was stamped off on scrap paper then on the flower and the third layer was stamped off twice before on the flower image. I’ve die cut So Saffron Vellum card stock with the label from the set to anchor the rose and leaf’s, in fact all die cut images on the card are from the Wild Rose Dies. The finishing touch to the card is five 2019-2021 In-Color Faceted Dots for just the right amount of subtle bling.


Thank you for taking the time to stop by today, hope this project has inspired you to try paper crafting. Have a great day – Craft On!

Follow me on Instagram @cqueen309 and on Facebook at “Cards and Crafts with Karen”.

Click on any of the images below for more product information and to order directly from my on-line store.

When shopping, please add the current Host Code 2XHVYVB9 to your order and check demonstrator contact, then I can happily send you a re-useable thank you card. For orders is over $150, please use all of the Host Rewards you’ve earned.  Otherwise, I’d love for you to add your order to the current Host Code 2XHVYVB9.

Happy Shopping!


Magnolia’s two ways

The cards for today are similar yet different – I’m featuring Rococo Rose & Seaside Spray (both new 2019-2021 In-Colors) with the same layout and Magnolia flowers.  One card has gold heat embossing and the other water coloring.

The bundle being used is Good Morning Magnolia – cling mount stamp set with matching Magnolia dies.

First is the card with Rococo Rose.  The card starts with two strips of matching designer paper adhered directly to the card base. Next on Whisper White card stock, I ran the embossing buddy over it to remove any static or oils left behind from touching the paper with my fingers, stamped the image with Versamark ink on the paper, sprinkled Gold Embossing powder over it, tapping off the excess and heat setting with my heat tool. Three pearls finish the card for a feminine touch.

For the Seaside Spray card, I changed it up a bit by punching banner ends with the Triple Banner Punch and water coloring the image. Image was stamped with Staz-on ink on watercolor paper, colored with an Aqua Painter in matching ink before being die cut.  Both card have ‘Hello’ on the front, one as a banner and one directly on the card front. Aren’t they both just divine!

Thank you for taking the time to stop by today, hope this project has inspired you to try paper crafting. Have a great day – Craft On!

Follow me on Instagram @cqueen309 and on Facebook at “Cards and Crafts with Karen”.

Click on any of the images below for more product information and to order directly from my on-line store.

When shopping, please add the current Host Code 2XHVYVB9 to your order and check demonstrator contact, then I can happily send you a re-useable thank you card. For orders is over $150, please use all of the Host Rewards you’ve earned.  Otherwise, I’d love for you to add your order to the current Host Code 2XHVYVB9.

Happy Shopping!


Same layout two ways !

Today I am featuring two cards made with the Floral Essence Photopolymer Stamp set, part of the Floral Essence Bundle – which comes with the Perennial Flower Punch that matches one of the flowers in the set. I’m not using the punch, just the stamp set.

Each card is the same design, one is monochromatic the other uses three bright vibrant colors!

First is the monochromatic, one color, card – I’m using the new 2019-2021 In-Color Seaside Spray. The card starts with a piece of card stock cut to 4″ x 5 1/4″ for stamping – first the greeting then flowers and leaves. Next use one of your favorite dies to die cut the greeting. I’ve adhered the stamped piece directly to the card base, then the die cut image is backed with Stampin’ Dimensionals and adhered.

For this card, I decided on three colors: Poppy Parade, Garden Green and Crushed Curry, though I did use Memento Black ink for the greeting.  First I stamped the greeting in the center, then the Poppy Parade flowers, followed by the leaf’s in Mossy Meadow and filling in any spaces with Crushed Curry flower centers. It’s a bright and cheerful card. Next I die cut the Stitched Shape Square from the center. The Whisper White stamped piece is layered on Garden Green card stock on a Poppy Parade base. The die cut piece is adhered with Stampin’ Dimensionals.

Thank you for taking the time to stop by today, hope this project has inspired you to try paper crafting. Have a great day – Craft On!

Follow me on Instagram @cqueen309 and on Facebook at “Cards and Crafts with Karen”.

Click on any of the images below for more product information and to order directly from my on-line store.

When shopping, please add the current Host Code 2XHVYVB9 to your order and check demonstrator contact, then I can happily send you a re-useable thank you card. For orders is over $150, please use all of the Host Rewards you’ve earned.  Otherwise, I’d love for you to add your order to the current Host Code 2XHVYVB9.

Happy Shopping!


Precious Pets for PCC340

Happy Sunday, hope you are all having a great weekend. It’s gloomy here this weekend, I’ve spent a little time crafting, getting a hair cut and watching some Hallmark movies.

Today’s project is for the Paper Craft Crew Challenge – Inspiration Challenge – Precious Pets, PCC340.

For this week’s challenge I’ve opted for a Shadow Box made out of Soft Suede cardstock. The shadow box starts with a piece of cardstock 8.5″ x 8.5″ and even has a kick stand on the back to hold it up, this way none of the sheet of card stock goes to waste.  The pattern for the box is from a video by Julie DiMatteo on YouTube.

The Happy Tails stamp set & Dog Builder punch was used to complete the inside of the box.

I’ve decorated the box with names of all our dogs, as we are pet parents – no kids.  The stamp set used is the photopolymer set, Make a Difference along with the Clear Block A, which made it easy!

  • Snowman, a Siberian Husky
  • Princess, a Siberian Husky
  • Bandit, a Siberian Husky
  • Barron, a German Shepard
  • Nitro, a German Shepard
  • Diesel, a German Shepard

Here are a few pictures I thought you might enjoy.

Below is Bandit and Barron, both have crossed the rainbow bridge to meet up with Snowman & Princess.  Barron loved to play “splashy” when the pool was open in the summer – while Bandit would run the other direction.

and here is Nitro & Diesel from last summer keeping me company while I was in the pool.

Thank you for taking the time to stop by today, hope this project has inspired you to try paper crafting. Have a great day – Craft On!

Follow me on Instagram @cqueen309 and on Facebook at “Cards and Crafts with Karen”.

Click on any of the images below for more product information and to order directly from my on-line store.

When shopping, please add the current Host Code 2XHVYVB9 to your order and check demonstrator contact, then I can happily send you a re-useable thank you card. For orders is over $150, please use all of the Host Rewards you’ve earned.  Otherwise, I’d love for you to add your order to the current Host Code 2XHVYVB9.

Happy Shopping!


FabFri165 for Friday!

Happy Friday, closer to the weekend. Any special plans? Nothing for me so far but you never know, things can always change at the last minute. I do need to work on this months Sunday Stampers class, so I guess I just figured out something I need to work on this weekend.

Today’s card is for the FabFri165 challenge, the banner is below.  Check out their blog and play along if you like.

To create my card I’ve started with a card base of Pretty Peacock and stamped images in the same color ink from the Beautiful Friendship Photopolymer Stamp set all other the front. I’ve used the Stitched Rectangle Dies to die cut a mat of Pineapple Punch card stock and Whisper White card stock for stamping. Using Pineapple Punch ink I’ve stamped one the larger flowers then stamped the greeting in the center with Pretty Peacock of the Whisper White piece. On the bottom of the Pineapple Punch I’ve added a piece of Tear n Tape, then cut a piece of Scalloped Linen Ribbon in Pretty Peacock and adhered it. The entire element was adhered with Stampin’ Dimensionals.

Thank you for taking the time to stop by today, hope this project has inspired you to try paper crafting. Have a great day – Craft On!

Follow me on Instagram @cqueen309 and on Facebook at “Cards and Crafts with Karen”.

Click on any of the images below for more product information and to order directly from my on-line store.

When shopping, please add the current Host Code 2XHVYVB9 to your order and check demonstrator contact, then I can happily send you a re-useable thank you card. For orders is over $150, please use all of the Host Rewards you’ve earned.  Otherwise, I’d love for you to add your order to the current Host Code 2XHVYVB9.

Happy Shopping!


Daisy Lane part 2

On Sunday I used the Daisy Lane Bundle for my card for the Paper Craft Crew weekly challenge, today I thought I would show you how you can use the stamp set using the same design for both a masculine and feminine card.

The funny thing about these cards is that I woke up one morning around 3am and could not get back to sleep because I was thinking about cards I could make using this stamp set. Finally I got back to sleep and during the day I wrote down the colors I wanted to use and made the cards in the evening.

Both cards are made the exact same way, just in different colors.  The images are stamped on Whisper White card stock cut to 3.75″ x 5″, starting with the lightest to the darkest color. Both are then matted on the darkest color card stock cut to 3 7/8″ x 5 1/8″ and on a card base made from the lightest color.  Happy Birthday is die cut using the Well Written Dies and your favorite die cutting machine.

For this card I’ve use:

  • Balmy Blue
  • Seaside Spray
  • Blueberry Bushel

For this card I decided to use the following colors:

  • Petal Pink
  • Rococo Rose
  • Melon Mambo

Thank you for taking the time to stop by today, hope this project has inspired you to try paper crafting. Have a great day – Craft On!

Follow me on Instagram @cqueen309 and on Facebook at “Cards and Crafts with Karen”.

Click on any of the images below for more product information and to order directly from my on-line store.

When shopping, please add the current Host Code 2XHVYVB9 to your order and check demonstrator contact, then I can happily send you a re-useable thank you card. For orders is over $150, please use all of the Host Rewards you’ve earned.  Otherwise, I’d love for you to add your order to the current Host Code 2XHVYVB9.

Happy Shopping!


Which type of crafter are you?

So which type of crafter are you?

  • Beginner – just starting out
  • Casual – craft every now and then
  • Avid  – owns a lot of supplies and crafts alot

For my set of three cards showing each crafter type I’ve used the Beautiful Friendship Photopolymer stamp set, which has 13 stamps including images and greetings.

I’m starting with the Beginner stamper card – which uses three simple products: Very Vanilla Card stock, Coastal Cabana Ink pad and stamp set. I’ve cut a piece of card stock 3.75″ x 5″ and started by stamping the largest two images on the bottom corners and used other images to fill in the bottom half and stamped the greeting in the top left. For the card base, which is 5.5″ x 8.5″, scored at 4.25″, I’ve done second generation stamping (ink the stamp, stamp on scrap paper then the card front). Once the card front is stamped, I added the stamped focal piece with liquid glue.

Here is the Casual Stamper card, it starts with the same 3.75″ x 5″ piece of Very Vanilla card stock, but for this card all the flowers are stamped in different colors and matted on Coastal Cabana card stock which is cut just slightly larger at 3 7/8″ x 5 1/8″, then adhered with Stampin’ Dimensionals to the card base.

Colors include:

Coastal Cabana – Highland Heather – Mango Melody

Flirty Flamingo – Granny Apple Green

Inside of the Casual stamper has a couple flowers, one stamped in each of the bottom corners and a few leaves as well. Flowers are Flirty Flamingo and Highland Heather.

Below, for the Avid stamper I’ve done triple layer stamping, stamping all three layers of Very Vanilla at the same time, then backing them with a Basic Black mat and adhering each layer with Stampin’ Dimensionals. I’ve used a second stamp set, Daisy Lane for the greeting which is stamped in Memento Black ink. To go along with the “It’s your time to shine” I’ve mixed a few drops of Frost White Shimmer paint with 70% Rubbing Alcohol in a Stampin’ Spritzer and gently spritzed the card for added shimmer and shine.

The inside of the card for the Avid stamper incorporates all five ink colors, each is stamped off on scrap paper before stamping the inside, only the greeting is full strength ink.

Thank you for taking the time to stop by today, hope this project has inspired you to try paper crafting. Have a great day – Craft On!

Follow me on Instagram @cqueen309 and on Facebook at “Cards and Crafts with Karen”.

Click on any of the images below for more product information and to order directly from my on-line store.

When shopping, please add the current Host Code 2XHVYVB9 to your order and check demonstrator contact, then I can happily send you a re-useable thank you card. For orders is over $150, please use all of the Host Rewards you’ve earned.  Otherwise, I’d love for you to add your order to the current Host Code 2XHVYVB9.

Happy Shopping!


Daisy Lane Bundle for PCC339

So how is your weekend going? We had a graduation party Friday night with some great food and I was able to spend a few hours in the pool on Saturday – my first pool time this summer!

Today’s card is for the Paper Craft Crew Vertical Card Sketch challenge, PCC339, banner below. Check their blog out my clicking here.

To create my card I started with a piece of  new Terracotta Tile card stock along with matching ink pad. For my card I decided to use the new Daisy Lane Bundle – the Daisy Lane stamp set and matching Medium Daisy Punch.  The stamp set also has a flower that goes with the Daisy Punch as well, a carryover punch from the prior catalog.

I’ve stamped the fern image around the edge of the card base to get started, then stamped and punched one large daisy and two medium daisy’s before punching them out. The two medium daisy’s have been layer together and adhered to the large daisy with a Stampin’ Dimensional. The flower was added to a rectangle of Whisper White, matted on Basic Black that has been stamped with ‘Smile’ from the stamp set. Before adhering to the card base with Stampin’ Dimensionals I added a piece of Whisper White Flax Ribbon. To finish off the card I added three Terracotta Tile Faceted Dots from the 2019-2021 collection.

Thank you for taking the time to stop by today, hope this project has inspired you to try paper crafting. Have a great day – Craft On!

Follow me on Instagram @cqueen309 and on Facebook at “Cards and Crafts with Karen”.

Click on any of the images below for more product information and to order directly from my on-line store.

When shopping, please add the current Host Code 2XHVYVB9 to your order and check demonstrator contact, then I can happily send you a re-useable thank you card. For orders is over $150, please use all of the Host Rewards you’ve earned.  Otherwise, I’d love for you to add your order to the current Host Code 2XHVYVB9.

Happy Shopping!

New Product Video’s

Hi there! Need a little relaxation time, why not grab your favorite beverage and watch the following Stampin’ Up! video’s and check out some of the new products available.

Good Morning Magnolia Video

Above the Clouds Bundle:

Daisy Lane Bundle:

Magnolia Blooms Cards Collection:

Pressed Petal Suite

Thank you for taking the time to stop by today, hope this project has inspired you to try paper crafting. Have a great day – Craft On!

Follow me on Instagram @cqueen309 and on Facebook at “Cards and Crafts with Karen”.

Click on any of the images below for more product information and to order directly from my on-line store.

When shopping, please add the current Host Code 2XHVYVB9 to your order and check demonstrator contact, then I can happily send you a re-useable thank you card. For orders is over $150, please use all of the Host Rewards you’ve earned.  Otherwise, I’d love for you to add your order to the current Host Code 2XHVYVB9.

Happy Shopping!


Magnolia Lane Gate Fold Card

Happy Friday! Hope your having a good week so far. We attended a high school graduation party Sunday afternoon and have another this evening, a great way to start the weekend.

Today I’m sharing with you a card I’ve made using the Magnolia Lane Suite of Products.  The card base is 5.5″ x 8.5″, scored on the 8.5″ side 2 1/8″ from each end. Magnolia Lane Designer Series Paper (which is beautiful – look for some additional posts next week) is layering on either side on the front on Mossy Meadow card stock – card base is Petal Pink. Below is a close up of the card and matching belly band.

Here is a picture of the inside of the card and the belly band used to kept the card together. For the inside Whisper White cardstock  I stamped the magnolia stamp in Petal Pink at the top and bottom (opposite corners) and then stamped the greeting in Mossy Meadow in the middle. The belly band was made with a 1″ wide strip of designer series paper, wrapped around, secured with adhesive and any excess paper cut away. I like to get the seam in the front and cover with the focal image. For mine, I stamped the image on Watercolor paper, using an Aqua Painter and ink pads colored in the image, added some Clear Wink of Stella for shine and die cut with the matching die. The flower sits on a Mossy Meadow die cut with the largest Layering Circle die, layered with a piece of Petal Pink vellum from the Perennial Essence Vellum cardstock package, sentiment from the stamp set and bow from the Magnolia Lane Ribbon Combo Pack finish off the focal image.


Thank you for taking the time to stop by today, hope this project has inspired you to try paper crafting. Have a great day – Craft On!

Follow me on Instagram @cqueen309 and on Facebook at “Cards and Crafts with Karen”.

Click on any of the images below for more product information and to order directly from my on-line store.

When shopping, please add the current Host Code 2XHVYVB9 to your order and check demonstrator contact, then I can happily send you a re-useable thank you card. For orders is over $150, please use all of the Host Rewards you’ve earned.  Otherwise, I’d love for you to add your order to the current Host Code 2XHVYVB9.

Happy Shopping!


2019-2020 Annual Catalog Goes Live Today!

Today June 4, 2019 the  new 2019-2020 Stampin’ Up! Annual Catalog goes live for all customers at 12noon MT or 2PM EST.

The catalog has some wonderful new products including the new 2019-2021 In-Colors, these colors have coordinating 1/2″ Scalloped Linen Ribbon, Faceted Dots, Stampin’ Write Markers,  8 1/2″ x 11 ” and 12″ x 12″ cardstock packages and finally 6″ x 6″ Designer Series Paper.

Pretty Peacock

Purple Posy

Rococo Rose

Seaside Spray

Terracotta Tile

Today I thought I would share with you the very first card I madeusing some of the new products from the 2019-2020 Annual Catalog, these products  are part of the Perennial Essence Suite which includes:

  • Floral Essence Bundle
    • Floral Essence Stamp Set
    • Perennial Flower Punch
  • Perennial Essence 12″ x 12″ Designer Series Paper
  • Perennial Essence 12″ x 12″ Vellum Card stock
  • 5/8″ Organdy Striped Ribbon
  • Perennial Essence Floral Centers

For my card I used the Pretty Peacock Card Stock & Ink (new 2019-2021 In-Color), Layering Squares Framelits and Clear Faceted Gem.  While making the card I realized that the Leaf Punch works nicely with the leaf stamp included in the set – nice bonus if you ask me! The greeting on the card is one of my favorites, who wouldn’t like to receive a card with this greeting on the front.


Thank you for taking the time to stop by today, hope this project has inspired you to try paper crafting. Have a great day – Craft On!

Follow me on Instagram @cqueen309 and on Facebook at “Cards and Crafts with Karen”.

Click on any of the images below for more product information and to order directly from my on-line store.

When shopping, please add the current Host Code 2XHVYVB9  to your order and check demonstrator contact, then I can happily send you a re-useable thank you card. For orders is over $150, please use all of the Host Rewards you’ve earned.  Otherwise, I’d love for you to add your order to the current Host Code 2XHVYVB9.

Happy Shopping!


Not much time left for these items . . .

Counting today there are only two days left for the 2019 Occasions Catalog and the current 2018-2019 Annual Catalog, June 3rd is the last days for these catalogs. Ordering ends at 11:50 PM Mountain Time on June 3rd.

June 4th the new annual catalog goes live at 12 noon Mountain Time (2PM EST – my local time zone).

Thought I would highlight a few cards made with retiring items and there is a link for easy shopping at the bottom.

Bloom by Bloom along with Dandelion Wishes:

Dear Doily Stamp Set:

Falling Flowers:

Bella & Friends:

Sitting Here Stamp Set:

Ribbon of Courage stamp set

Thank you for taking the time to stop by today, hope this project has inspired you to try paper crafting. Have a great day – Craft On!

Follow me on Instagram @cqueen309 and on Facebook at “Cards and Crafts with Karen”.

Click on any of the images below for more product information and to order directly from my on-line store.

When shopping, please add the current Host Code WCCR77BV to your order and check demonstrator contact, then I can happily send you a re-useable thank you card. For orders is over $150, please use all of the Host Rewards you’ve earned.  Otherwise, I’d love for you to add your order to the current Host Code WCCR77BV.

Happy Shopping!