Monthly Archives: April 2020

Miss You / Thank you Mask cards

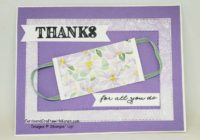
Today I’m sharing two “mask” cards I made after seeing a few  Pinterest cards.

This first card is for all the front line/first responders out there – without you none of us could get through this!

Here is another version of the card but for all the family and friends I miss seeing and spending time with,  Easter just wasn’t the same this year and I miss my dinners with the NHHS 76er’s!  Looking forward to when I can give you a big hug again!

Here are the card basics:

  • Thick Whisper White card base
  • Petal Pink card uses three of the Stitched Rectangle Dies teamed with Best Dressed Designer Series Paper
  • Highland Heather card uses two of same dies, but the mat (not a die cut) was run through my die cutting machine using the Subtles 3D Embossing Folder
  • Basic Black was using to die cut ‘miss you’ from the Well Written Dies
  • Thanks for all you do are stamps from the new Ornate Thanks Bundle
  • Mask is a 2 3/4″ x 2 1/8″ piece of Best Dressed Designer Series Paper
    • score at 1/2″ – 1″ – 1 1/2″ on the 2 1/8″ side
    • flip over and score at 5/8″ – 1 1/8″ – 1 5/8″
    • mountain and valley fold the score line
    • secure on the back with Tear n Tape (TnT)/Whisper White card stock
      • run a piece of TnT  along the edge of Whisper White card stock and cut with your paper trimmer to create a 1/4″ strip
      • use this strip to secure the back of the mask
      • puff open the mask in the middle and secure with another piece of the Whisper White strip
    • add 2 3/4″ pieces of ribbon for ear loops
    • secure to the card front with 3 Mini Stampin’ Dimensionals on each side

Thank you for taking the time to stop by today, hope this project has inspired you to try paper crafting. Have a great day – Craft On!

Follow me on Instagram @cqueen309 and on Facebook at “Cards and Crafts with Karen”.

Click on any of the images below for more product information and to order directly from my on-line store.

When shopping check demonstrator contact, then I can happily send you a re-useable thank you card. For orders is over $150, please use all of the Host Rewards you’ve earned.  Otherwise, I’d love for you to add your order to the Current Code WUJ9A9NR.

Happy Shopping!


Ever think to rip your DSP?

Happy Tuesday, hope you are doing well and the weather is good where you are.  Yesterday was beautiful here, I picked a good vacation day – sunny and in the mid 60’s, rain is suppose to return today.

Today I have a quick and fun card using ripped designer paper and a matching envelope. Matching designer series paper envelopes are easy to make, just adhere a piece of designer paper to the flap of the envelope and cut away the excess – quick, simple and looks so cute!

Here is how I put the card together:

  • Thick Whisper White card stock base – 4¼” x 11″, scored at 5½”
  • Mint Macaron card stock mat – 4 1/8″ x 5 3/8″
  • Piece of Designer Series Paper – 4″ x 6″ (do 6 from 1 sheet of 12″ x 12″ paper)
    • about 2/3 down on the 6″ side of the paper rip it across horizontally
  • Adhere one portion of the paper to the mat with just a thin border at the top
  • Flip the other piece over and adhere at the bottom of the mat, overlay the top piece if necessary
  • Cut 18″ of ribbon, wrap around the unit and tie a bow roughly were the ripped card stock meet
  • Adhere to the card front, you can even use Stampin’ Dimensionals if you like
  • Stamp and punch out sentiment, adhere to card
  • Finish with some rhinestones or pearls that coordinate with the designer paper

Thank you for taking the time to stop by today, hope this project has inspired you to try paper crafting.

Have a great day – Craft On!

Follow me on Instagram @cqueen309 and on Facebook at “Cards and Crafts with Karen”.

Click on any of the images below for more product information and to order directly from my on-line store.

When shopping check demonstrator contact, then I can happily send you a re-useable thank you card. For orders is over $150, please use all of the Host Rewards you’ve earned.  Otherwise, I’d love for you to add your order to the Current Code WUJ9A9NR.

Happy Shopping!

April 2020 Sunday Stamper Projects

Today my Sunday Stampers would have been meeting, but with the stay at home orders in place we can’t meet but I still want to share with you the cards the group would have been making.  This month is a little different, any of the group that orders this month will be receive a kit complete with some cards  already made and others to make on their own using greetings of their choice.  Each person is also receiving two additional projects I’ll be featuring in a blog post next month.

Here is a look at all four cards:

The first card features products from the Ornate Garden Suite including Ornate Garden Specialty Designer Series Paper and Ornate Style Stamp set. I’ve used a greeting from Varied Vases and a Daffodil Delight Ruched Ribbon Bow. Image is colored with Stampin’ Blend markers.

The 2nd card is a square card using a brad to attach the two pieces together and any stamp set greeting can be used.

Next we have a fun card featuring three die cuts from the “In the Tropics” dies, part of the Timeless Tropics bundle, the stamp set & dies will be carried over to the 2020-2021 Annual Catalog, but as separate purchases not a bundle, get them today at 10% bundle price savings!

Here is another card using the Ornate Garden Suite of products along with a piece of a Gold Foil sheet, Flirty Flamingo and Early Espresso card stock.  By using the stamp ‘just wanted to say’ – the card can be used for any occasion!

Download a project sheet to create these projects at home, April 2020 Sunday Stamper Cards

Thank you for taking the time to stop by today, hope this project has inspired you to try paper crafting. Have a great day – Craft On!

Follow me on Instagram @cqueen309 and on Facebook at “Cards and Crafts with Karen”.

Click on any of the images below for more product information and to order directly from my on-line store.

When shopping check demonstrator contact, then I can happily send you a re-useable thank you card. For orders is over $150, please use all of the Host Rewards you’ve earned.  Otherwise, I’d love for you to add your order to the Current Code WUJ9A9NR.

Happy Shopping!


Cut up that Designer Series Paper for quick easy cards!

Ok we both know you have a stash of designer series paper, why not cut some up for the quick and easy cards to send out to let family and friends know you are thinking about them – that’s my project this weekend!

This card group features the Woven Threads Designer Series Paper, four pieces that measure 4″ x 5.25″, then on the 4″ side cut at 2¼”, then cut the other piece at 2 7/8″ – separate so you are using one designer on each card – mat on card stock – then on card base using colors from the designer series paper.  I’ve added some embellishments (2019-2021 In-Color Faceted Dots).  Sentiments are stamped in the same color as the mat color or you can use Memento Black ink.

Here are some cards using the Peaceful Poppies Designer Series Paper.

For this match of cards using the Woven Threads Designer Series Paper I cut 4 pieces 4″ x 5.25″, stacked them up and randomly cut then at diagonal lines, then matted them on Pretty Peacock card stock making sure to use one of each pattern. Circle punches, layering circle dies or any shape punches/dies can be used for the greetings. I thought adding two pieces of ribbon adhered with Tear N Tape added nice dimension to the cards.

Here are the other two cards using the Peaceful Poppies Designer Series Paper.

Thank you for taking the time to stop by today, hope this project has inspired you to try paper crafting. Have a great day – Craft On!

Follow me on Instagram @cqueen309 and on Facebook at “Cards and Crafts with Karen”.

Click on any of the images below for more product information and to order directly from my on-line store.

When shopping check demonstrator contact, then I can happily send you a re-useable thank you card. For orders is over $150, please use all of the Host Rewards you’ve earned.  Otherwise, I’d love for you to add your order to the Current Code WUJ9A9NR.

Happy Shopping!

Link below to all “Last Chance” Products!

Last Chance Products List

Woo Hoo!

The Stampin’ Up! Last Chance / Retiring Lists are now available for both the 2019-2020 Annual Catalog along with the 2020 Mini Catalog.

All items are while supplies last and will be discontinued after June 2nd.  Stamp set will have guaranteed availability through May 15, 2020

Download your copies now!

Last Chance Mini Catalog Excel Version: Last Chance Products Mini Catalog

Last Chance Mini Catalog PDF Version: Last Chance Products Mini Catlaog (US)

Last Chance Annual Catalog Excel Version: Last Chance Products Annual Catalog (US)

Last Chance Annual Catalog List PDF Version:   Last Chance Products Annual Catalog (US)

Click here to start shopping now!

Thank you for taking the time to stop by today, hope this project has inspired you to try paper crafting. Have a great day – Craft On!

Follow me on Instagram @cqueen309 and on Facebook at “Cards and Crafts with Karen”.

When shopping check demonstrator contact, then I can happily send you a re-useable thank you card. For orders is over $150, please use all of the Host Rewards you’ve earned.  Otherwise, I’d love for you to add your order to the Current Code WUJ9A9NR.

Happy Shopping!


Retiring 2018-2020 In-Colors

Later today Stampin’ Up! releases the retiring list, so today is the perfect day to share some cards I made over the weekend featuring the 2018-2020 Retiring In-Colors. Each year there are five colors retired and five new colors introduced, I can’t wait to see them!

Retiring 2018-2020 In-Colors:

  • Pineapple Punch
  • Grapefruit Grove
  • Lovely Lipstick
  • Call Me Clover
  • Blueberry Bushel

Here is the first set of cards made with coordinating envelopes, just add designer paper to the envelope flap, turn over and following the flap, trim off the excess.

First we have Pineapple Punch – a bright and cheerful color!

Next is Grapefruit Grove, I started out not liking this color, but it turned out to be a favorite!

Lovely Lipstick, perfect for the Best Dressed Suite of products from the 2020 Mini Catalog.

Call Me Clover – perfect for St. Patrick’s Day !

and finally – Blueberry Bushel – a bright & cheerful blue!

Here is another card layout perfect for coordinating card stock and designer series paper.

  • Card stock base – 4¼” x 11″, scored at 5½”
  • Whisper White Card stock is 3½” x 4¼”
  • Three strips of designer paper 1″ x 4″
  • Add the 2 outside strips first, then the middle one, it’s easier to line up this way
  • Basic Black card stock Sunburst Punch out
  • 2″ Whisper White Circle – stamp with the greeting of your choice


Lovely Lipstick – Grapefruit Grove – Pineapple Punch


Call me Clover – Blueberry Bushel

Thank you for taking the time to stop by today, hope this project has inspired you to try paper crafting. Have a great day – Craft On!

Follow me on Instagram @cqueen309 and on Facebook at “Cards and Crafts with Karen”.

Click on any of the images below for more product information and to order directly from my on-line store.

When shopping check demonstrator contact, then I can happily send you a re-useable thank you card. For orders is over $150, please use all of the Host Rewards you’ve earned.  Otherwise, I’d love for you to add your order to the Current Code WUJ9A9NR.

Happy Shopping!


Smooth Sailing Watercolor Thanks

Today’s card is for all the Essential Workers out there, we truly appreciate all you are doing for everyone!

Here is how I put the card together:

  • Sailing Home Bundle
    • Sailing Home Cling Mount Stamp Set
    • Smooth Sailing Dies
  • Gray Granite card stock base – 4¼” x 11″, scored at 5½”
  • Watercolor Paper – 3½” x 4¾”
  • Whisper White card stock to stamp images with Gray Granite Ink
  • Die Cut images with coordinating dies
  • Use the lighthouse as a guide to lightly add watercolor wash with So Saffron & Poo Party ink
  • Lighthouse and sailboat on right are adhered with Mini Stampin’ Dimensionals
  • Sailboat on left, adhered directly to watercolor paper, along with the Silver Foil Wheel die cut
  • Thanks banner adhered directly to lighthouse
  • Images from the stamp set where stamped all over the flap of the envelope

Thank you for taking the time to stop by today, hope this project has inspired you to try paper crafting. Have a great day – Craft On!

Follow me on Instagram @cqueen309 and on Facebook at “Cards and Crafts with Karen”.

Click on any of the images below for more product information and to order directly from my on-line store.

When shopping check demonstrator contact, then I can happily send you a re-useable thank you card. For orders is over $150, please use all of the Host Rewards you’ve earned.  Otherwise, I’d love for you to add your order to the Current Code WUJ9A9NR.

Happy Shopping!


Cute Note card and Pizza box gift set

First let me start by telling you that the Retiring List will be available  the afternoon of April 22nd, as soon as possible I will post a downloadable version!

Two items have already sold out and are no longer available, the Basket Weave 3D Embossing Folder and Brights 6″ x 6″ Designer Series Paper.

Today I thought I would share with you a cute little gift set I put together using a Mini Pizza Box and the Best Dressed Note Cards & Matching Envelopes since I used the Best Dressed Designer Series Paper. For the project any designer paper works and just make your own 3″ x 3″ note cards (3″ x 6″, scored in half) with Whisper White 3″ x 3″ envelopes.

Here is the close up of the decorated Mini Pizza Box, using the Daisy & Medium Daisy Punches along with the Leaf Punch,  There is Pearlized Doily layered on the Designer Series Paper and Mint Macaron card stock mat. Clear Faceted Gem is in the center, feel free to add Stampin’ Dimensionals to your Daisy for added depth.

The note card and envelope sets are all similar, 2.75″ square of vellum embossed with a 3D folder, 2″ circle punch of designer paper matted on a coordinating Starburst punch out.  Sentiment was stamped with Memento Black ink from the Itty Bitty Greetings Stamp Set and punched out the Classic Label Punch.  You can use Stampin’ Dimensionals if desired for more depth on the note cards.

Petal Pink cards:

Purple Posy cards:

I’ve also used the Mini Curvy Keepsakes Box, tied with a Purple Tricolor Ribbon bow and tag using the Bouquet Bunch Dies and coordinating Beautiful Bouquet Stamp set for the “For You”, I’ve added a few covered chocolates inside.

Aren’t these cute, they would make great Mother’s Day Gifts! or for any occasion to say thank you!

Thank you for taking the time to stop by today, hope this project has inspired you to try paper crafting. Have a great day – Craft On!

Follow me on Instagram @cqueen309 and on Facebook at “Cards and Crafts with Karen”.

Click on any of the images below for more product information and to order directly from my on-line store.

When shopping check demonstrator contact, then I can happily send you a re-useable thank you card. For orders is over $150, please use all of the Host Rewards you’ve earned.  Otherwise, I’d love for you to add your order to the Current Code WUJ9A9NR.

Happy Shopping!


Just Breathe.

Just Breathe  – how perfect is this sentiment right now, sometime to just need to take a step back from the news, relax and “just breathe”.

Today I created a bright and cheerful card that reminds me of spring with blossoms on the trees using the Colorful Seasons Photopolymer Stamp Set and Seasonal Layers Dies – who thinks these might be retiring items?

Here is how the card is made:

  • Flirty Flamingo card stock base 5.5″ x 8.5″, scored at 4.25″
  • Early Espresso card stock mat 4″ x 5.25″
  • Whisper White card stock 4″ x 5.25″ for inside
  • Whisper White card stock 3 7/8″ x 5 1/8″ for outside
    • use either sponge brayer, dauber or sponge pieces to color the Whisper White, colors I used are listed below
      • Granny Apple Green
      • Pool Party
      • Balmy Blue
      • Petal Pink
      • Daffodil Delight
  • Chair from Seasonal Layers Dies is cut from Pineapple Punch card stock
  • Branch from the same dies cut in Soft Suede card stock
  • Flowers stamped in Flirty Flamingo and die cut with matching dies and adhered with Stampin’ Dimensional
  • “Just Breathe” stamped in Early Espresso ink
  • Rhinestones from Noble Peacock Rhinestones are added to the center of the flowers.

Thank you for taking the time to stop by today, hope this project has inspired you to try paper crafting. Have a great day – Craft On!

Follow me on Instagram @cqueen309 and on Facebook at “Cards and Crafts with Karen”.

Click on any of the images below for more product information and to order directly from my on-line store.

When shopping check demonstrator contact, then I can happily send you a re-useable thank you card. For orders is over $150, please use all of the Host Rewards you’ve earned.  Otherwise, I’d love for you to add your order to the Current Code WUJ9A9NR.

Happy Shopping!


Tropical Dreaming . . .

This past weekend we had warmer temperatures and I just could not stop thinking about my cruise last year and how much I enjoyed the tropical aspect of the trip so I decided to make a few more cards featuring the Tropical Oasis Suite.

Here’s how I inked and stamped the palm trees and pineapple – I used the edge of the ink pad to just ink up the part I wanted colored then stamped it, now I did practice a few times on computer paper before using my Whisper White card stock but once I got the hang of it, it was rather easy!

The piece of Tropical Oasis Designer Series Paper is 3¾” x 5″ and cut on the 3¾” side at 1¼” then the bottom was flipped before adhering to a mat of Terracotta Tile, there is a strip of the card stock covering the seam and linen thread wrapped around three times before the entire piece was added to the Pool Party card base.  Trees, pineapple and greeting are all adhered with Stampin’ Dimensionals.


Here is an additional card I made using some additional palm trees I stamped and die cut, along with a flower stamped with Grapefruit Grove ink. The card base is Soft Suede, there is a 3″ x 4″ piece of Designer Series in the center with 2 sets of palm trees and a flower adhered with Stampin’ Dimensionals. The greeting banner is also adhered with Stampin’ Dimensionals. Finishing  touch is a rhinestone in the center of the flower.


Thank you for taking the time to stop by today, hope this project has inspired you to try paper crafting. Have a great day – Craft On!

Follow me on Instagram @cqueen309 and on Facebook at “Cards and Crafts with Karen”.

Click on any of the images below for more product information and to order directly from my on-line store.

When shopping check demonstrator contact, then I can happily send you a re-useable thank you card. For orders is over $150, please use all of the Host Rewards you’ve earned.  Otherwise, I’d love for you to add your order to the Current Code WUJ9A9NR.

Happy Shopping!


Happy Easter

Easter Blessings.

This year will be a different Easter holiday, not celebrating in church or with extended family and friends, please enjoy today’s card to let you know I’m thinking of all my crafty friends today.


Thank you for stopping my, have a great day, Craft On!

Braided Tropical Oasis

Today I thought I would share special fun fold card – a “braided” or “lattice weave”.

I’m featuring the Timeless Tropical Bundle, currently the dies are on backorder and should be available around April 20th, along with the Tropical Oasis Designer Series Paper (12″ x 12″).

Here is how I put the card together:

  • Soft Suede card stock base
  • Stitched Rectangle Dies (layering) using Grapefruit Grove and Whisper White card stock
  • Soft Suede ink was used for the greeting
  • For the flower, I inked the stamp with Grapefruit Grove ink and using a sponge added some Real Red ink
  • Leaves are die cut using Pear Pizzazz card stock
  • Designer Series Paper is cut 4″ x 5.25″, folded in half and using a pattern from Pinterest cut and folded to create the braid and then adhered directly to the front of the card.
  • At the end of the post is a link to the video from Pinterest I used


Thank you for taking the time to stop by today, hope this project has inspired you to try paper crafting. Have a great day – Craft On!

Follow me on Instagram @cqueen309 and on Facebook at “Cards and Crafts with Karen”.

Click on any of the images below for more product information and to order directly from my on-line store.

When shopping check demonstrator contact, then I can happily send you a re-useable thank you card. For orders is over $150, please use all of the Host Rewards you’ve earned.  Otherwise, I’d love for you to add your order to the Current Code 6JZ4MGQC.

Happy Shopping!

Here is a link to the video I used to create the braid/lattice weave used in my card.


Cut up the Designer Series Paper!

Today I thought I would share with you a card layout to use up the designer series paper, it’s a simple layout and you can use any die cut or even punches for the sentiments – dress it up with bows, sequins, rhinestones or pearls – any embellishment will work!

The layout for all the cards in todays post is simple, it’s just the designer series paper that changes:

  • Card base – either 4¼” x 11″ scored at 5½” or 5 ½” x 8½” scored at 4¼”
  • Designer Series Paper – 3 pieces 1¼” x 5½” or 6″ (I prefer longer strips and cut off the excess so that the entire length of the Whisper White is covered
  • Whisper White 3¾” x 5″ to adhere the designer paper to
  • Coordinating card stock for a matting
  • Coordinating ink pads for the greeting

The first card I’m sharing uses the Best Dressed Designer Series Paper teamed with the So Sentimental Bundle for the die cut and the greeting.

The next two cards are perfect for the guys in your life, or even a women golfer. The designer series paper is the Clubhouse collection, from the Country Club Suite – so even if you don’t know a golfer, the paper is a guy oriented.

The final two cards today use the Birthday Bonanza Designer Series Paper.  The card on the left has all the animal images a toucan, lion and koala from the designer paper and the other card features the “B” side of the paper!  For bling on these cards, I used some of the SAB sequins and twine I had on hand.

Thank you for taking the time to stop by today, hope this project has inspired you to try paper crafting. Have a great day – Craft On!

Follow me on Instagram @cqueen309 and on Facebook at “Cards and Crafts with Karen”.

Click on any of the images below for more product information and to order directly from my on-line store.

When shopping check demonstrator contact, then I can happily send you a re-useable thank you card. For orders is over $150, please use all of the Host Rewards you’ve earned.  Otherwise, I’d love for you to add your order to the Current Code 6JZ4MGQC.

Happy Shopping!


Hope be your Lighthouse

As I looked through my stamp sets wondering what to stamp I came across this greeting in the High Tide Photopolymer stamp set and thought it was perfect as we stay at home and practice social distancing during this trying time.

Let hope be your Lighthouse, beckoning you through Stormy Seas

We all miss seeing, hugging and spending time with our family and friends, hopefully today’s card brings you some peace and let’s you know I care about you.

Here is how I put today’s card together.

  • Card base is Crumb Cake card stock cut 4.25″ x 11″, scored at 5.5″
  • Mat of Cherry Cobbler card stock 4″ x 5.25″, adhered with Stampin’ Dimesionals
  • Whisper White for stamping – 3 7/8″ x 5 1/8″
  • Order of stamping I followed
    • Gray Granite ink for the base of the lighthouse
    • Cherry Cobbler ink for the accent color of the lighthouse
    • Sahara Sand ink for the ground, first stamped around the lighthouse, then all over the bottom turning the stamp around as a stamped
    • Masked off the light house and used Pool Party ink for the water, both full strength and 2nd generation
    • Daffodil Delight ink was used for the rays of light
    • Garden Green inkfor the foliage and sentiment
    • Memento Black ink for the seagulls

Thank you for taking the time to stop by today, hope this project has inspired you to try paper crafting. Have a great day – Craft On!

Follow me on Instagram @cqueen309 and on Facebook at “Cards and Crafts with Karen”.

Click on any of the images below for more product information and to order directly from my on-line store.

When shopping check demonstrator contact, then I can happily send you a re-useable thank you card. For orders is over $150, please use all of the Host Rewards you’ve earned.  Otherwise, I’d love for you to add your order to the Current Code 6JZ4MGQC.

Happy Shopping!


More Ornate Garden Suite Samples

Here are three more samples using the new Ornate Gard Suite, this is an amazing suite, with two bundles, specialty designer series paper, 3D embossing folder, ribbon combo and gilded gems. There is a downloadable brochure at the end of this post.

Here’s the video for your viewing pleasure!

  • Ornate Thanks Bundle
    • Ornate Thanks Stamp Set
    • Ornate Border Dies
  • Ornate Style Bundle
    • Ornate Style Stamp Set
    • Ornate Layers Dies
  • Ornate Floral 3D Embossing Folder
  • Ornate Garden Specialty Designer Series Paper
  • Ornate Garden Ribbon Combo Pack
  • Gilded Gems

The first card today has an Early Espresso card stock base and mat from the Ornate Garden Specialty Designer Series Paper that was run through the Ornate Floral 3D Embossing Folder and lightly kissed with the Terracotta Ink pad. Image was stamped, randomly cut apart and adhered with Stampin’ Dimensionals. Greeting stamped on banner of Whisper White layered on a portion of a die cut layers die.  There is a piece of ribbon wrapped around the designer paper and tied in a bow.

Here is another water-colored image on a designer series paper frame with matching Terracotta Tile card stock base. I’ve used Mint Macaron ribbon for the bow and the new Gilded Gems for the bling!

The final card for today features a 4″ x 4″ square of designer series paper matted and adhered directly to the card base.  The frame is Old Olive card stock with a stamped Whisper White layer that is  2 1/8″ x 3 1/2″. Words are stamped in Old Olive and corner images in Terracotta Tile, adding the bow in the corner is a great finishing touch!

Download the Ornate Garden Suite brochure here: SU FLYER_ORNATE_GARDEN

Thank you for taking the time to stop by today, hope this project has inspired you to try paper crafting. Have a great day – Craft On!

Follow me on Instagram @cqueen309 and on Facebook at “Cards and Crafts with Karen”.

Click on any of the images below for more product information and to order directly from my on-line store.

When shopping check demonstrator contact, then I can happily send you a re-useable thank you card. For orders is over $150, please use all of the Host Rewards you’ve earned.  Otherwise, I’d love for you to add your order to the Current Code 6JZ4MGQC.

Happy Shopping!

Come Sail Away Memories & More Project

Looking for a fun and easy project?

This past weekend I was looking through the products I had and came across my Come Sail Away Memories & More Card Pack and some of the Assorted Memories & More Card bases with matching envelopes and decided to challenge myself into making a project with them and so, a Folder with 4 cards was born!

First I took a piece of the Come Sail Away Designer Series Paper, 12″ x 12″, scored down the center on one side at 6″ and then 1/2″ on both ends, turn the paper 1/4 of a turn and scored at 4″.  Fold and burnish all the score lines. The 4″ section was folded up to create the pockets and the 1/2″ on the outside folded in to finish off the outside and help create the pockets on the bottom. I’ve also cut a section of paper out at the center fold for an easier get in/out of the pocket. Finishing touch is some bakers twine wrapped around twice and some of the stickers from the Memories & More cards decorating the inside.

Here is what the outside looks like decorated, I’ve even included a Sail Away Trinket attached with a few Mini Glue Dots.

All the cards I’m showing you where made with cards from the Memories and Mores package.  There are a total of 50 double-sided cards, 2 each of 25 designs, in 3″ x 4″ and 4″ x 6″ sizes. There are 6 single sided laser cut specialty cards (lighthouse is below) and 4 sticker sheets.

Some people think Memories & More Card Packs are just for memory keeping or scrapbooking, but they are perfect for quick easy cards without stamps! Team the card packs up with the Assorted Memories & More Cards & Envelopes to make cardmaking easier than ever! Just adhere cards to the card bases and you’re done, you get 10 each of the small & large size in each pack.

Card #1:

Card #2:

Card #3:

Card #4 – this one features one of the laser cut images, that is backed with a piece of Night of Navy Card stock.

Thank you for taking the time to stop by today, hope this project has inspired you to try paper crafting. Have a great day – Craft On!

Follow me on Instagram @cqueen309 and on Facebook at “Cards and Crafts with Karen”.

Click on any of the images below for more product information and to order directly from my on-line store.

When shopping check demonstrator contact, then I can happily send you a re-useable thank you card. For orders is over $150, please use all of the Host Rewards you’ve earned.  Otherwise, I’d love for you to add your order to the Current Code 6JZ4MGQC.

Happy Shopping!

Ornate Garden Suite Available today!

Today the Ornate Garden Suite, one of the new suites from the up coming 2020-2021 Annual Catalog is available!

This is an amazing suite, with two bundles, specialty designer series paper, 3D embossing folder, ribbon combo and gilded gems. There is a downloadable brochure at the end of this post.

  • Ornate Thanks Bundle
    • Ornate Thanks Stamp Set
    • Ornate Border Dies
  • Ornate Style Bundle
    • Ornate Style Stamp Set
    • Ornate Layers Dies
  • Ornate Floral 3D Embossing Folder
  • Ornate Garden Specialty Designer Series Paper
  • Ornate Garden Ribbon Combo Pack
  • Gilded Gems

The first card I’d like to share with you made with products from this suite includes using Gold Foil with the Ornate Garden 3D Embossing Folder and water-colored image that was gold heat embossed as well.

The second card I’m featuring shows you eleven of the sides of the Ornate Garden Specialty Designer Series Paper.  The paper has some sides that are foil embossed both on white and colored backgrounds, the possibilities with this paper is endless. The banner was cut from a Gold Foil Sheet, the same color in the paper. Stamped banner has images stamped from the set, flowers and words.

This was the first card I made with the suite and uses the ink dragging technique, what ink dragging you ask? I’ll explain. First the focal image was stamped with Versamark on Watercolor paper and heat embossed using White Powder, then I used my Crushed Curry Ink  pad and dragged it down the image until I liked the color – the ink does not stick to the embossed image – I think this looks really cool and you could do this technique with so many images. The card also uses one the dies from the suite and the Gilded Gems.

The final card I have for you today is similar to one on the brochure with a Mint Macaron card base and mat embossed with the new Ornate Floral 3D Embossing folder. Focal image was stamped in Versamark, heat embossed with Gold Embossing powder, cut into 3 pieces and adhered to the card front with Stampin’ Dimensionals. Terracotta File and Petal Pink card stock was used for the floral dies at the bottom from the Ornate Border Dies. The card has a bow in Terracotta Tile from the Ornate Garden Ribbon Combo Pack adhered with Mini Glue Dot.

Download the Ornate Garden brochure here: SU FLYER_ORNATE_GARDEN

Thank you for taking the time to stop by today, hope these projects have inspired you to try paper crafting. Have a great day – Craft On!

Follow me on Instagram @cqueen309 and on Facebook at “Cards and Crafts with Karen”.

Click on any of the images below for more product information and to order directly from my on-line store.

When shopping check demonstrator contact, then I can happily send you a re-useable thank you card. For orders is over $150, please use all of the Host Rewards you’ve earned.  Otherwise, I’d love for you to add your order to the Current Code 6JZ4MGQC.

Happy Shopping!