Monthly Archives: December 2018

Bits & Pieces for PCC319

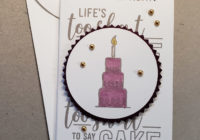
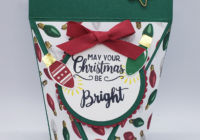
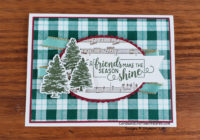
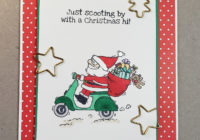
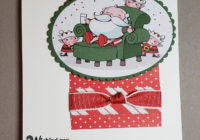
Happy New Years Eve! – any special plans for tonight? We are having a nice quiet dinner at home (lobster tails, green bean casserole and chocolate cake). It’s hard to believe this is the last post for 2018, where did the year go? It’s amazing how time just flies.

Today’s card is for the Paper Craft Crew Sketch challenge, the banner for the sketch is below and you can check out their blog here.

For my card today I used Bits & Pieces from my “left-over” envelope – it’s where I keep all the extra pieces from projects not used or I punched/die cut for ???. The card starts with a Night of Navy card base with a piece of watercolor paper that was colored Brusho Colour Crystals (spritz the watercolor paper with water, sprinkle with the crystals and spritz again and le dry).

Next are layers of ribbon, scalloped copper foil circle, whisper white stitched shape circle, flowers from Pop of Petals Bundle in Poppy Parade, Crushed Curry and Grapefruit Grove, Mossy Meadow leafs and some sparkly adhesive backed sequins. The sentiment is from the Waterfront Photopolymer stamp set and stamped in Night of Navy ink.

Thank you for taking the time to stop by today, hope you are inspired to try paper crafting and stamping. Have a great day – Craft On! 

Follow me on Instagram @cqueen309 and Facebook at “Cards and Crafts with Karen”. 

Click on any of the images below for more product information and to order directly from my on-line store.  

Please add your order to the current Host Code CPW94NG6, check demonstrator contact, and I’ll happily send you a re-useable thank you card and free gift. For orders is over $150, please use all of the Host Rewards you’ve earned.  Otherwise, I’d love for you to add your order to the current Host Code CPW94NG6. 

Happy Shopping!


Take & Make, not a Make & Take

Normally at Stampin’ Up! events we do “Make & Takes”, were us demonstrators get to try new products to make and take home. This year as part of the OnStage 2018 in Orlando, while we did some Make & Takes we received a “Take & Make” using the new Amazing Life Stamp Photopolymer stamp set along with a package to make a card with a Whisper White Narrow Note card.

When you are looking at the 2019 Occasions catalog you will notice the Amazing Life 17 piece Stamp set come in a bundle with the new Rectangle Stitched Framelits (13 total dies).

For my card since we only received the stamp set I decided to use the Starburst and 2″ Circle Punches to create my card. Using Gray Granite ink, I stamped a background on the narrow note card first using two different stamps. Next I punched a Blackberry Burst Starburst and 2″ circle using Whisper White card stock. Since the stamps are photopolymer it was easy to stamp the cake in the center of the circle. I used Pineapple Punch & Light Blackberry Bliss Stampin’ Blend Markers to color the cake, before adhering to the Starburst then the card front using Stampin’ Dimensionals. For an accent I added some Gold Metallic Pearls.

Keep in mind the Amazing Life Bundle will not be available until January 3, 2019 when both the Occasions & Sale-A-Bration catalogs start.

Thank you for taking the time to stop by today, hope you are inspired to try paper crafting and stamping.  

Follow me on Instagram @cqueen309 and Facebook at “Cards and Crafts with Karen”. Have a great day – Craft On!

Click on any of the images below for more product information and to order directly from my on-line store.

Please add your order to the current Host Code CPW94NG6, check demonstrator contact, and I’ll happily send you a re-useable thank you card and free gift. For orders is over $150, please use all of the Host Rewards you’ve earned.  Otherwise, I’d love for you to add your order to the current Host Code CPW94NG6. 

Happy Shopping!

FabFri153 Sketch Challenge

Happy Friday. Yesterday I went to have my new driver license photo taken. I was number 196 and they were on 182, it actually went faster than I thought since numbers 190-194 magically disappeared, now I’m good for another few years!

Todays card is for FabFri153, a sketch challenge. Banner for the sketch is below and you can click here to check out their blog. For each challenge they pick a “Fab Five” and my card was picked for FabFri152, you can see that post here.

For my card I decided to preview some of the new products in the 2019 Occasions Catalog, available for purchase January 3, 2019.

  • Geared Up Garage Bundle (save 10%)
    • Geared Up Garage Cling Mount Stamp Set (10 stamps)
    • Garage Gears Thinlits Dies (14 dies)
  • Classic Garage 6″x6″ Designer Series Paper
  • Black/Silver ¼” Striped Metallic Ribbon

The car was stamped with Real Red ink and die cut using it’s matching die, before being added to a Stitched Shaped Circle stamped with images from the stamp set. A piece of ribbon was adhered with Mini Glue Dots for texture.

There is a peek of the inside were I stamped gears, stops and a gas can on the lower left corner.

When describing this new stamp set I called it a “cling” mount stamp set.  All stamps in the Occasions catalog are either Photopolymer or the new “Cling” mount. Here is a video from Stampin’ Up! which explains these new Cling stamps.

Thank you for taking the time to stop by today, hope you are inspired to try paper crafting and stamping.  Have a great day – Craft On!

Follow me on Instagram @cqueen309 and Facebook at “Cards and Crafts with Karen”. 

Click on any of the images below for more product information and to order directly from my on-line store.  

Please add your order to the current Host Code CPW94NG6, check demonstrator contact, and I’ll happily send you a re-useable thank you card and free gift. For orders is over $150, please use all of the Host Rewards you’ve earned.  Otherwise, I’d love for you to add your order to the current Host Code CPW94NG6. 

Happy Shopping!

Who doesn’t need some simple & easy cards sometime?

Hope everyone had a nice holiday and where able to spend time with friends and family. On Christmas we Skyped with my brother and his family in New Jersey while opening gifts which is always fun and went to my cousins for a big family dinner with lots of great food that included: ham, turkey, stuffing, mashed potatoes, dumplings, broccoli & rice casserole, green bean casserole, carrots, macaroni & cheese, vegan meatballs with sweet potatoe noodles, salad and lots of cookies!

Today I thought I would share a couple cards made using the Calligraphy Essentials Stamp set for the words and the Pop of Petals Bundle (Pop of Petals Stamp Set & coordinating Four-Petal Flower) on Very Vanilla card bases.  To get started I first stamped the words in the middle of the card fronts, then punched out four each of the flowers from 2017-2019 In-Color Designer Paper to create 2 flowers, layering 2 flowers together with a dimensional in between. I then positioned the flowers were I wanted them on the cards and using the leaf from the Pop of Petals stamp set stamped them on the card front before adhering the flowers.

The flowers on this card are Fresh Fig with Gold Faceted Gems for centers.

The flowers on the second card are Berry Burst with Glitter enamel dots for centers.

Why not try making some of your own simple and easy cards today?

Thank you for taking the time to stop by today, hope you are inspired to try paper crafting and stamping.  

Follow me on Instagram @cqueen309 and Facebook at “Cards and Crafts with Karen”. Have a great day – Craft On!

Click on any of the images below for more product information and to order directly from my on-line store.

Please add your order to the current Host Code CPW94NG6, check demonstrator contact, and I’ll happily send you a re-useable thank you card and free gift. For orders is over $150, please use all of the Host Rewards you’ve earned.  Otherwise, I’d love for you to add your order to the current Host Code CPW94NG6.

Happy Shopping!


It’s Christmas!

Merry Christmas, did you hear Santa and his reindeer last night?

Hope you have an enjoyable day with family and friends!

Thank you for taking the time to stop by today, Craft On!

Last Minute Gift Packaging – Self Closing Box

It’s hard to believe Christmas is just 3 days from now, if you are looking for a cute packaging idea this self closing box may be just for you. This version of the box is large enough for a gift card, small gift, quite a bit of small candy pieces or even some cash!

All you need is a 6″ x 8″ piece of card stock and 2 – 3¾” x 3¾” pieces of Designer Series Paper, then decorate using punches or framelits all ready in your stash.  You will need either your Simply Score Tool or Trimmer along with a ruler to use with the card stock for all the score lines. For the designer paper, you simply fold in half lightly and cut from the fold to each corner.

Writing the directions for this is a little tricky, so I created a template and attached below to help out.

Why not try one today?

Download a template drawing to help you make your own self closing box here – Self Closing Box Template.

Thank you for taking the time to stop by today, hope you are inspired to try paper crafting and stamping.  Have a great day – Craft On!

Follow me on Instagram @cqueen309 and Facebook at “Cards and Crafts with Karen”.   

Click on any of the images below for more product information and to order directly from my on-line store.  

Please add your order to the current Host Code CPW94NG6, check demonstrator contact, and I’ll happily send you a re-useable thank you card and free gift. For orders is over $150, please use all of the Host Rewards you’ve earned.  Otherwise, I’d love for you to add your order to the current Host Code CPW94NG6. 

Happy Shopping!

Gift Box with cover – 2 ways – Great packaging option!

Pretty soon Christmas will be here, if you are in need of a quick small packaging option, I have one for you.

While looking through Pinterest and blogs that I follow this past weekend I came across this Gift Box with cover on Dawn Griffith’s blog. She received a gift from Vicki Spicer and liked the packaging so much she decided to duplicated the packaging.

Well I liked this idea so much that I decided to CASE the project – CASE is (copy and share with everyone). This packaging is perfect for any small gift or some candy!

Here is a close up of the two gift boxes I made, one for each Christmas & Birthdays.

The gift box with cover is easy to make here is what you need:

  • Cardstock
    • 3″ x 12″, scored at 3″ – 4″ – 7″ – 8″ – 11″ – for the cover
    • 4 13/16″ x 4 13/16″ square – for the box, scored at 1″ on all four side
  • Card stock Mats – 2 7/8″ x 2 7/8″ square
  • Designer Series Paper / Whisper White – 2 3/4″ x 2 3/4″ square

The 12″ x 12″ paper I used is from the 2018-2020 In-Color Paper Pack.

To make the cover, burnish all score lines on the 3″ x 12″ piece, add liquid adhesive from the 11″ score line to the 12″ end and adhere to the space between the 3″ and 4″ score lines. This will create the opening for the box. For the box, burnish the score line, trim up 1″ on all four corners on the score lines and adhere to create the box. To show the recipient which side to open I punched a 1 1/4″ circle from designer paper, folded in half and adhered to the side of the box that should be used to pull out the box.  Template to download below.

Inside of the holiday box using stamps from the Making Christmas Bright Stamp set.

Inside of the birthday box using the circle stamp from Making Christmas Bright Stamp set along with the flowers and sentiment from Picture Perfect Birthday Stamp set.

Download a template to assist in making this project, Covered Box Template.

Thank you for taking the time to stop by today, hope you are inspired to try paper crafting and stamping. 

Follow me on Instagram @cqueen309 and Facebook at “Cards and Crafts with Karen”.  Have a great day – Craft On! 

Click on any of the images below for more product information and to order directly from my on-line store.  

Please add your order to the current Host Code CPW94NG6, check demonstrator contact, and I’ll happily send you a re-useable thank you card and free gift. For orders is over $150, please use all of the Host Rewards you’ve earned.  Otherwise, I’d love for you to add your order to the current Host Code CPW94NG6. 

Happy Shopping!

Punch = Quick Card Background

December 18th – one week to Christmas!

Today I thought I would share a quick and easy cards and can be made with products you most likely already have – Punches! To get started all you need is a piece of card stock 4″ x 5 1/4″, designer series paper and a punch – for my samples I used the Tailored Tag Punch.

Using the designer series paper start by punching out about 9 – 12 pieces, depending on size and adhere them to a mat, the 4″ x 5 1/4″ card stock mentioned above, cut from card stock matching the card base or a coordinating color. Cut off any excess from the edges. For the Christmas card, I used Thick Whisper White card stock for the base and Garden Green card stock for the mat. The focal center image is a Large Scalloped Edge Circle from Vellum card stock, Pearlized Doily, Real Red Starburst Punch and sentiment from So Santa punched out with Tailored Tag Punch and backed with coordinating Garden Green card stock. Finishing touch is two strand Garden Green & White Bakers Twine bow.

The card below has a Thick Very Vanilla card stock base and images where punched from the Wood Textures Designer Series Paper.  Tranquil Tide card stock was used with Happy Birthday Framelit to create the focal image, then applied with the fine tip glue pen.


Remember any punch or die cut can be used with designer series paper to create a great background for your cards.

Thank you for taking the time to stop by today, hope you are inspired to try paper crafting and stamping.  

Follow me on Instagram @cqueen309 and Facebook at “Cards and Crafts with Karen”. 

Have a great day – Craft On! 

Click on any of the images below for more product information and to order directly from my on-line store.  

Please add your order to the current Host Code CPW94NG6, check demonstrator contact, and I’ll happily send you a re-useable thank you card and free gift. For orders is over $150, please use all of the Host Rewards you’ve earned.  Otherwise, I’d love for you to add your order to the current Host Code CPW94NG6. 

Happy Shopping!


PCC318 Inspirational Challenge – Holidays!

Happy Sunday, how’s your weekend going? I’ve been using this weekend as holiday prep, making sure I have all the ingredients for our annual Christmas morning monkey bread and Broccoli & Rice casserole I make for Christmas dinner, getting the gifts together for the Christmas Eve grab bag and most important – my Christmas manicure & pedicure – Red with Sparkles!

Today’s card is for the Paper Craft Crew Challenge – Inspiration – Holiday. Check out their blog here, why not play along. When I first saw the banner for this challenge right away I knew I wanted to use the All is Bright Designer Series Paper Ornament print paper.

To make my card I started with a rectangle of the designer series paper and before adhering it to a mat of Gold Foil, I die cut a large scalloped oval to use as a mat for the sentiment, which is adhered with Stampin’ Dimensionals. The sentiment is from Merry Christmas to All and heat embossed with Gold Embossing powder. Don’t forget to use your embossing buddy on the Very Vanilla card stock before stamping to remove any static or oils from the paper – this helps with “stray” powder.  The sprigs are from the Frosted Bouquet Framelits Dies, part of the First Frost Bundle. Sprigs are die cut in both Gold & Silver Foil Sheets along with Sparkle Glimmer Paper. The final touches include Metallic Pearls and Rhinestones.

Thank you for taking the time to stop by today, hope you are inspired to try paper crafting and stamping.  

Follow me on Instagram @cqueen309 and Facebook at “Cards and Crafts with Karen”.  Have a great day – Craft On! 

Click on any of the images below for more product information and to order directly from my on-line store.  

Please add your order to the current Host Code CPW94NG6, check demonstrator contact, and I’ll happily send you a re-useable thank you card and free gift. For orders is over $150, please use all of the Host Rewards you’ve earned.  Otherwise, I’d love for you to add your order to the current Host Code CPW94NG6. 

Happy Shopping!


Color Challenge for FabFri152

Happy Friday!

Today’s card is for the Fab Friday 152 color challenge, you can check out their blog here.

When I first saw the colors that make up this challenge, I thought of the Buffalo Check background stamp and a Christmas image.  To get started I used Shaded Spruce ink to stamp the Buffalo Check stamp on Very Vanilla card stock, used the Dark Pool Party Stampin’ Blend Marker to draw lines, cut the paper down to 3 7/8″ x 5 1/8″ and matted on Cherry Cobbler card stock cut to 4″ x 5 1/4″. I also used the Cherry Cobbler card stock to die cut the largest scalloped layering oval.

Next using the matching layering oval I die cut it out with Very Vanilla card stock, stamped using the Music Sheet background stamp using Soft Suede ink. Sentiment from Making Christmas Bright stamp set is on a 1″ banner and stamped in Mossy Meadow.  Mossy Meadow Trees are from the Rooted in Nature stamp set, die cut with their coordinating dies, tree in the back was adhered using liquid glue and front trees with Mini Stampin’ Dimensionals. Before adhering this piece to the card I added Snail adhesive to the card front, cut a piece of Gold 3/8″ Metallic Edged Ribbon colored it with the Dark Pool Party Stampin’ Blend Marker and added it, the oval is backed with Stampin’ Dimensionals and adhered.

Thank you for taking the time to stop by today, hope you are inspired to try paper crafting and stamping.  

Follow me on Instagram @cqueen309 and Facebook at “Cards and Crafts with Karen”. 

Have a great day – Craft On! 

Click on any of the images below for more product information and to order directly from my on-line store.  

Please add your order to the current Host Code CPW94NG6, check demonstrator contact, and I’ll happily send you a re-useable thank you card and free gift. For orders is over $150, please use all of the Host Rewards you’ve earned.  Otherwise, I’d love for you to add your order to the current Host Code CPW94NG6. 

Happy Shopping!


Fun Fold 2 Ways

Today I have a Fun Fold card for you featuring both a Christmas and Birthday version. With this layout there are so many possible versions you can make, all you need is designer series paper and some card stock.

Here are the layers for the card:

  • Card base – 4¼” x 5½”, quarter of 8½” x 11″ card stock
  • Mat – 4 1/8″ x 5 3/8″ piece of card stock
  • Designer Series Paper – 4″ x 8″, scored at 4″ for a square card
  • Inside of 4″ x 4″ DSP is 3 ¾” x 3¾” piece of Whisper White/Very Vanilla
  • Front has Layering Square/Circle Framelits (using make sure to only adhere to the one side to assist in keeping the card closed

Front of the Christmas card version using All is Bright Designer Series Paper, Layering Circles, May Flowers Framelits, Sprig Punch, Stitched Shape Framelit and Gold Foil Sheets. Sentiment on the front is embossed in gold with a stamp from the Hearts Come Home Stamp Set.

Inside of the Christmas version, the Whisper White corners are punched using the Trio Edge Punch.

Outside of the birthday version:

Inside of the birthday card, Very Vanilla inside is stamped with the flower from Beautiful Day in Petal Pink and greeting from Picture Perfect Birthday Photopolymer Stamp set.

Thank you for taking the time to stop by today, hope you are inspired to try paper crafting and stamping.  

Follow me on Instagram @cqueen309 and Facebook at “Cards and Crafts with Karen”. 

Have a great day – Craft On! 

Click on any of the images below for more product information and to order directly from my on-line store.  

Please add your order to the current Host Code CPW94NG6, check demonstrator contact, and I’ll happily send you a re-useable thank you card and free gift. For orders is over $150, please use all of the Host Rewards you’ve earned.  Otherwise, I’d love for you to add your order to the current Host Code CPW94NG6. 

Happy Shopping!


Tone on Tone for Christmas

It’s December 11th – 2 weeks before Christmas, are you ready?

Today I’m featuring a card with tone on tone stamping, the image from the Half Full Stamp Set is stamped in Merry Merlot Ink on Merry Merlot card stock. When I stamp like this I stamp on the card stock before scoring to avoid any image mess ups at the fold, this is my preference you may like scoring then stamping. The base is 4 1/4″ x 11″, scored at 5 1/2″ for a top folding vertical card, my favorite vertical layout.

Sentiment was stamped using Memento Black as well as the holly berry image on Thick Very Vanilla card stock, then die cut using a Stitched Shape Oval Framelit. The leaves were colored using the Dark Shaded Spruce Stampin’ Blend Marker and Red Rhinestones added to the berries. This was then matted on a Gold Foil Scalloped Oval and adhered to the card base with Stampin’ Dimensionals.  The finishing touch is a bow made from the Gold Metallic Edged Ribbon, which just happens to be Very Vanilla. I missed taking a picture of the inside, but it says Merry Christmas and has the berry image stamped a few times.


Thank you for taking the time to stop by today, hope you are inspired to try paper crafting and stamping.  

Follow me on Instagram @cqueen309 and Facebook at “Cards and Crafts with Karen”. 

Have a great day – Craft On! 

Click on any of the images below for more product information and to order directly from my on-line store.  

Please add your order to the current Host Code CPW94NG6, check demonstrator contact, and I’ll happily send you a re-useable thank you card and free gift. For orders is over $150, please use all of the Host Rewards you’ve earned.  Otherwise, I’d love for you to add your order to the current Host Code CPW94NG6. 

Happy Shopping!


First Frost meets Dandelion Wishes for PCC317

Happy Saturday, any special plans today? I’ve already done my food shopping and need to run a few errands before going to a holiday party this evening. Everyone is to dress as their favorite holiday character, I have my costume ready, I’ll post a photo next week, need to keep it a surprise for now, but here is a hint – there is a character named “Karen” in the story.

Today’s card is for the Paper Craft Crew Challenge PCC317, you can check out their blog here and play along!


For my card I decided to mash up the First Frost Bundle from the 2018 Holiday catalog with Dandelion Wishes one of the popular stamp sets from the annual catalog. The card has a Soft Sea Foam card base and uses paper from the Garden Impressions Designer Series Paper on the left and for the horizontal banner. The sentiment was stamped in Shaded Spruce and punched out with the 2″ Circle Punch before being adhered to a Shaded Spruce Starburst which is adhered with Stampin’ Dimensional. The Calypso Coral & So Saffron flowers are from First Frost and die cut with their coordinating die. Vellum cardstock sprigs add some textures. Finishing touches are some Faceted Dots.

Thank you for taking the time to stop by today, hope you are inspired to try paper crafting and stamping.

Follow me on Instagram @cqueen309 and Facebook at “Cards and Crafts with Karen”.

Have a great day – Craft On!

Click on any of the images below for more product information and to order directly from my on-line store.  

Please add your order to the current Host Code CPW94NG6, check demonstrator contact, and I’ll happily send you a re-useable thank you card and free gift. For orders is over $150, please use all of the Host Rewards you’ve earned.  Otherwise, I’d love for you to add your order to the current Host Code CPW94NG6. 

Happy Shopping!

Scooting on by . . .

Today I thought I would share a really cute card using the So Santa Stamp set from the 2018 Holiday Catalog – this was a stamp set I just had to have – I love the images and used the Santa with the surf board on my Onstage swap card, you can check that card out here.

The stamp set is on the retiring list,  get yours today!

To get started I stamped the “scooting Santa” in Memento Black ink on Whisper White card stock cut 3 1/8″ x 4 1/4″, then used the following Stampin’ Blend Markers to color the image:

  • Crumb Cake
  • Poppy Parade
  • Mango Melody
  • Call Me Clover
  • Highland Heather
  • Pool Party
  • Bermuda Bay
  • Rich Razzleberry
  • Pineapple Punch
  • Mint Macaron
  • Basic Black
  • Smoky Slate
  • Ivory

Once the image was colored, I used the Frost White Shimmer Paint (catalog# 147046) and an old Wink of Stella brush to paint the trim on Santa and add a nice sparkle. This piece was then added to a Call Me Clover mat along with three All is Bright Paper Clips, which is adhered to the card base with Stampin’ Dimensionals.  Card base is Thick Whisper White with Santa’s Workshop Specialty Designer Series Paper mat.

Thank you for taking the time to stop by today, hope you are inspired to try paper crafting and stamping.  

Follow me on Instagram @cqueen309 and Facebook at “Cards and Crafts with Karen”. 

Have a great day – Craft On! 

Click on any of the images below for more product information and to order directly from my on-line store.  

Please add your order to the current Host Code CPW94NG6, check demonstrator contact, and I’ll happily send you a re-useable thank you card and free gift. For orders is over $150, please use all of the Host Rewards you’ve earned.  Otherwise, I’d love for you to add your order to the current Host Code CPW94NG6. 

Happy Shopping!


Need a cute birthday card?

Need a cute birthday card, hop along below to check out how I made one.

Do you have some Toil & Trouble Designer Series Paper left over from Halloween and aren’t sure what to do with it? Below is a cute birthday card made with the frog side of one of the papers. The designer paper teams up nicely with Lemon Lime Twist & Basic Black cardstock. Sentiment is from the Picture Perfect Photopolymer Stamp Set and stamped on the largest of the ovals from the Stitched Shapes Framelits & backed with a Scalloped Oval, from the Layering Oval Framelits – all of these products are from the 2018-2019 Annual Catalog. For the bow I used the Black Glittered Organdy Ribbon, but Basic Black Shimmer Ribbon could easily be substituted.

This card is a good example of how a simple layout can be used to create an easy card. The card stock mat is 4″ x 5 1/4″ and designer series paper is 3 7/8″ x 5 1/8″. Die cut the scalloped oval from the mat before adhering the designer paper to save on card stock. Adding the oval with dimensionals gives added height and the bow is adhered direct to the card front.

Thank you for taking the time to stop by today, hope you are inspired to try paper crafting and stamping.  

Follow me on Instagram @cqueen309 and Facebook at “Cards and Crafts with Karen”. 

Have a great day – Craft On! 

Click on any of the images below for more product information and to order directly from my on-line store.  

Please add your order to the current Host Code CPW94NG6, check demonstrator contact, and I’ll happily send you a re-useable thank you card and free gift. For orders is over $150, please use all of the Host Rewards you’ve earned.  Otherwise, I’d love for you to add your order to the current Host Code CPW94NG6. 

Happy Shopping!   


Year-End Closeout starts today!

It’s your last chance to show 2018 some love! 

The Year-End Closeout Stampin’ Up!’s chance to do a little inventory cleaning—and your opportunity to take advantage of special year-end deals on retiring and surplus items.  Remember some items are last-chance and limited-inventory, so place your order while supplies last!

There are no minimum purchase required, discount applies to select items only, retiring items from the 2018 holiday catalog are available while supplies last.

Surplus items from 2018 annual catalog are available in limited quantities at the promotional price.

 Discounted items may be added to a Starter Kit—or purchased with Stampin’ Rewards—at the promotional price.

Ordering deadlines are –  Phone: January 2, 2019; 6:50 PM (MT) or  Online: January 2, 2019; 11:50 PM (MT).

The Year-End Closeout PDF list can be downloaded here.

The Year-End Closeout Excel file can be downloaded here.

2018 Holiday carryover list PDF list can be downloaded here.

Thank you for taking the time to stop by today, hope you are inspired to try paper crafting and stamping.  

Follow me on Instagram @cqueen309 and Facebook at “Cards and Crafts with Karen”.

Have a great day – Craft On! 

Please add your order to the current Host Code CPW94NG6, check demonstrator contact, and I’ll happily send you a re-useable thank you card and free gift. For orders is over $150, please use all of the Host Rewards you’ve earned.  Otherwise, I’d love for you to add your order to the current Host Code CPW94NG6.

Happy Shopping!


Catalog Case Santa’s Workshop

Today I thought I would share a couple more cards made with the Santa’s Workshop Specialty Designer Series Paper, there is flocking you can feel on the some of the images, and the Signs of Santa Photopolymer Bundle. These cards are based on cards in the holiday catalog and easy to put together. It’s possible the framelits may no longer be available due to popularity and availability to get back in stock before Christmas.

One thing to keep in mind as you look at any card is the layout – any designer paper and stamped images can be used to create the cards – don’t limit yourself to only the products you see below. Also, while I used the Starburst Punch & 2″ Circle Punch – you can substitute the Layering Circle Framelits – or any layering framelits just as easily.

This Basic Black card, 4 1/4″ x 11″, scored at 5 1/2″ for a top folding vertical card. Punch the Starburst out of the mat before adhering card stock to save on card stock and no one but you know since the designer series paper covers it up!


The Garden Green card base is 5 1/2″ x 8 1/2″ and scored at 4 1/4″ for a top folding horizontal card. Next are strips of designer paper, pick the ones you like together and adhere direct to the card front. Starburst punch was used to mat the image punched out with a 2″ Circle Punch, then adhered with Stampin’ Dimensionals.

Thank you for taking the time to stop by today, hope you are inspired to try paper crafting and stamping.  

Follow me on Instagram @cqueen309 and Facebook at “Cards and Crafts with Karen”. 

Have a great day – Craft On! 

Click on any of the images below for more product information and to order directly from my on-line store. 

Please add your order to the current Host Code CPW94NG6, check demonstrator contact, and I’ll happily send you a re-useable thank you card and free gift. For orders is over $150, please use all of the Host Rewards you’ve earned.  Otherwise, I’d love for you to add your order to the current Host Code CPW94NG6. 

Happy Shopping!

Resting Santa for FabFri151

Hi there, hope you are having a good weekend. Yesterday I went for a pedicure and almost fell asleep in the massage chair it was so relaxing, wrote out some holiday cards and purchased a few gifts. The gift for my nephew came and I can’t wait to see his face when he opens it – we video chat on Christmas morning to open presents – I’m sure this gift will be a hit!

Today’s card is for the FabFri151 challenge, you can check out their blog here. Banner for the sketch is below.

For my card I’m featuring the Santa’s Workshop Specialty Designer Series Paper and Signs of Santa Photopolymer Bundle (stamp set & Santa’s Signpost Framelits). The card was rather easy to put together, I used scraps of designer paper for the rectangle and small strip at the bottom, which then was wrapped with a knotted piece of Poppy Parade 5/8″ Ribbon before being adhered directly to the Whisper White card base. Santa and his helpers were die cut using a oval framelit and backed with a Garden Green scallop oval, then adhered with Stampin’ Dimensionals.

Here is the inside of the card, I cut a row of elves with presents to adhere to the bottom and stamped “… and more!” at the top.


Thank you for taking the time to stop by today, hope you are inspired to try paper crafting and stamping.  

Follow me on Instagram @cqueen309 and Facebook at “Crafts and Crafts with Karen”. 

Have a great day – Craft On! 

Click on any of the images below for more product information and to order directly from my on-line store.  

Please add your order to the current Host Code CPW94NG6, check demonstrator contact, and I’ll happily send you a re-useable thank you card and free gift. For orders is over $150, please use all of the Host Rewards you’ve earned.  Otherwise, I’d love for you to add your order to the current Host Code CPW94NG6. 

Happy Shopping!


PCC316 – Favorite New Product – Sneak Peek

Happy Saturday, it’s December 1st – hard to believe Christmas is just a few weeks away, I better get a move on with baking, gifts and sending out my cards – hopefully some of that will get done this weekend.

Today’s card is for the Paper Craft Crew Challenge, PCC316 – check out their blog here. I’d like to take a moment to that the group at PCC for picking my card from PCC313 as a top pick – check that card out here.

For my card I decided to use the new 2019 Sale-a-bration stamp set “Lovely Lattice”. This stamp set is one of the free sets you can pick starting January 5, 2019 with a $50 USD purchase using Sale-a-Bration. As a demonstrator we are able to pre-order products and this is one of the sets I picked.

For my card I decided to use Very Vanilla Note Cards, with matching envelopes and Very Vanilla Card stock. First I stamped the image on two note cards, leaving enough space at the bottom to stamp Happy Birthday from the Beautiful Day stamp set, and again on a piece of Very Vanilla card stock using Memento Black ink. Next using Stampin’ Blend Alcohol Markers I colored the flowers & leaf’s on the image stamped on the card stock, added Clear Wink of Stella and cut out the image with my paper snips. The 1 ½” Circle Punch was used to punch out a circle – you can framelits if you don’t have the right size punch. For the card I matched up the opening and glued the cut out image to the note card.

The photo below shows the card used for the PCC316 challenge as well as another note card made with punch out, this way none of the coloring is wasted. The punch out was added with Stampin’ Dimensionals and a few Share What You Love Artisan Pearls added for bling.

Thank you for taking the time to stop by today, hope you are inspired to try paper crafting and stamping.  

Follow me on Instagram @cqueen309 and Facebook at “Crafts and Crafts with Karen”.

Have a great day – Craft On!

Click on any of the images below for more product information and to order directly from my on-line store.

Please add your order to the current Host Code CPW94NG6, check demonstrator contact, and I’ll happily send you a re-useable thank you card and free gift. For orders is over $150, please use all of the Host Rewards you’ve earned.  Otherwise, I’d love for you to add your order to the current Host Code CPW94NG6. 

Happy Shopping!